I’ve had my iPhone 4 for about about 10 months, and, so far I haven’t dropped it and smashed the screen…

Unfortunately, even with my treating it like a baby, things are starting to fail.

First, the home button became unresponsive, which was highly irritating. Apple’s solution was turn on Touch Assist, which puts a software version of the home button on the screen, or, pay them $200 for a refurbished iPhone 4. I chose to purchase a new home button from iFixit for $15 and replace it myself. Awesome. No problem.

Fast forward a month. One morning I notice that even after a whole night on charge, it’s not past 50%. Oh buggery, (I think), I bet the battery monitoring system has raised some health exception and the iPhone has chosen to limit its charge so it doesn’t explode in my pocket. Looks like it’s time for a new battery. However, I thought I would try a ‘hard reset’ first, to see what happens. Keep in mind, that at this stage, the iPhone has not raised any information to the user, even if connected in iTunes. According to iTunes and the iPhone, everything is hunky dory, except it won’t charge past 50%.

Anyway, after the hard reset (hold down the power button and the home button until it powers off), it’s happily charging past 60% as I write this.

What’s going on Apple? Is the battery still good or not?

The days of 80 columns in a terminal are long gone. With wide screens and tabbed terminal emulators, I now often have terminals which are up to 150 or more columns wide. This can cause problems for applications which assume an 80 column terminal or are initialised with 80 columns and then are not ‘told’ that the terminal is wider.

If you’re using a terminal emulator over serial, then you can run into some annoying problems. For example, using a utility called picocom to open a serial terminal to some other system, which then presents a console with bash. Even if the terminal you started with was 150 columns wide, Bash wraps lines at 80 characters, which is annoying if you’re navigating around in a deep filesystem hierarchy.

So, the solution:

Before you start your picocom session, resize your terminal to the preferred width.

You can use the tput command to show you how many columns you’ve got if you’re interested:

elesueur@simple ~$ tput cols
143

Open picocom to your target:

elesueur@simple:~$ picocom -b 115200 /dev/ttyUSB2
picocom v1.4

port is        : /dev/ttyUSB2
flowcontrol    : none
baudrate is    : 115200
parity is      : none
databits are   : 8
escape is      : C-a
noinit is      : no
noreset is     : no
nolock is      : no
send_cmd is    : ascii_xfr -s -v -l10
receive_cmd is : rz -vv

Terminal ready

Ubuntu 10.10 elesueur-panda ttyO2

elesueur-panda login:

Login, and type stty -a

elesueur@elesueur-panda:~$ stty -a
speed 115200 baud; rows 0; columns 0; line = 0;

elesueur@elesueur-panda:~$ tput cols
80

elesueur@elesueur-panda:~$ echo $COLUMNS
80

Notice that Bash thinks the terminal is only 80 columns wide.

We could use stty or setterm to set our terminal width:

elesueur@elesueur-panda:~$ stty cols 143
elesueur@elesueur-panda:~$ stty -a
speed 115200 baud; rows 0; columns 143; line = 0;

But we still have the same problem. Bash needs to know that the terminfo data has been updated, and this is done with a simple command:

elesueur@elesueur-panda:~$ resize
COLUMNS=143;
LINES=57;
export COLUMNS LINES;

An strace of resize shows that it firstly writes a string to /dev/tty to obtain the current window size, then does a TIOCSWINSZ ioctl on /dev/tty to set the current size of the terminal:


write(3, “\0337\33[r\33[999;999H\33[6n”, 19

read(3, “\33[57;143R”, 4096)            = 9

ioctl(3, TIOCGWINSZ, {ws_row=0, ws_col=0, ws_xpixel=0, ws_ypixel=0}) = 0
ioctl(3, TIOCSWINSZ, {ws_row=57, ws_col=143, ws_xpixel=0, ws_ypixel=0}) = 0
— SIGWINCH (Window changed) @ 0 (0) —

Then immediately after it does the TIOCSWINSZ, it sends a SIGWINCH to Bash, which tells Bash that the window size has changed.

You don’t actually need to manually set the width with stty, resize figures the details out for you.

I don’t know why Bash can’t figure out the correct width when first started. Never-the-less, resize works well, and you could stick it in your .bashrc.
I’m currently attending the linux.conf.au conference here in Brisbane, Australia.

This morning, Vint Cerf spoke about the direction of the general Internet, and during Q&A, an audience member asked about bufferbloat.

I didn’t know what this  bufferbloat was, so I did a bit of reading, and found this.

In September of 2009, Dave Reed reported very long RTT’s with low packet loss on 3g networks on the end-to-end interest mailing list.  I’ve observed on several different operator’s 3g networks RTT times of order 6 seconds: Dave reported seeing up to 30 second RTT’s. These RTT’s are so long that many of the operations “time out”, by boredom (and extreme frustration) of the user.

Essentially, the explanation of bufferbloat is quite simple. The Internet revolves around the use of the transmission control protocol (TCP), which manages the rate at which nodes on the network send data by using congestion control techniques, such as exponential back-off. This works by monitoring when the network drops packets. If your computer notices that packets are being dropped, it is assumed that this is because of network congestion, and reduces the rate at which it sends new packets. Where the term bufferbloat comes in is buffers at various points in the network (several places in your computer, in your wireless router, in your ISP’s routers, the list goes on…) are getting larger, which confuses the TCP congestion control mechanisms, and creates huge queues of packets at all points in the network, giving rise to huge latencies.

Personally, I have experienced these problems on a daily basis using Vodafone’s 3G network.

If you’re interested in this problem, read more of Jim Gettys’ blog. If you work for Vodafone, please pass this information on.

[Edit] The description that David Reed gave of the problem on AT&T’s network is available here, the subsequent thread of conversation is an interesting dialog into TCP congestion control.

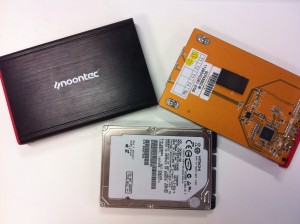
pic of hard drive and enclosure in piecesI recently purchased an external USB hard drive enclosure for a 2.5″ SATA disk drive.

It came with a USB cable with two ‘heads’, presumably because the hard drive might draw more current than a single USB port is specified to provide (500mA or 2.5W @ 5V).

In the past, I’ve done measurements on 2.5″ hard drives, and found that they draw much less than 2.5 W even at spin-up (the drive is an Hitachi 5400 RPM model). At idle, the drive consumes  about 400 mW and when spun-down, about 100 mW. At spin-up the power consumption surges to about 900 mW, then drops back to 400 mW.

Surely then, this external enclosure could power this 2.5″ hard drive from a single USB port? Not so. It turns out that the circuitry inside the enclosure draws a significant amount of power. About 900 mW to be exact. I went on a search to figure out why…

The enclosure is based around a Sunplus SATAlink SPIF215A single-chip USB->SATA controller. Looking at it’s datasheet, it’s supposed to draw a maximum of about 310mW from 3.3V and 1.8V rails, provided by a EMP5523 dual-output linear regulator.

There are also 3 (read it, three) bright blue LEDs to show you that the enclosure is powered up. Two of the LEDs had 100 ohm current-limiting resistors, and the third a 1 Kohm resistor. The two LEDs with 100 ohm resistors consume ~120mW of power alone.

A single USB port on my desktop machine was unable to provide enough power to spin up the hard drive until I unsoldered the two brightest LEDs leaving a single not-quite-so-bright LED to tell me when my hard drive enclosure is on. The hard drive now spins up.

What’s the lesson here? Poorly designed electronic devices consume a crazy amount of power. Low-efficiency linear regulators waste power too. When I’m using this external drive on my Laptop, I want it to consume as little power as possible so that my battery lasts as long as possible!

I and many others I know run MacOS as their primary operating system. Much of the research I do involves Linux, and therefore I often use Linux in order to become friendly with it.

A good way to run Linux is inside a virtual machine, where it need not worry about power management which unfortunately it doesn’t handle well, and fortunately, MacOS does. Linux is getting better though. Anyway, Linux runs well inside VMware Fusion, and with plenty of memory, you don’t even really notice that it’s running in a VM.

Sharing files between the host and the Linux is a problem that is easily solved. VMware try to give you tools to do it, and they seem to work well with Windows. MacOS has an NFS server, Linux does NFS well. With a little hacking, you can get MacOS and Linux to share a common home directory, allowing for very easy, seamless, integrated file sharing between the two environments.

Warning, the procedure below can be harmful to your Ubuntu installation if you do something wrong.

Give MacOS an /etc/exports file with the following contents (typical):

/Users/<macosuser> -network 172.16.97.0 -mask 255.255.255.0

Start nfsd by typing:

$ sudo nfsd enable

Install Ubuntu inside Fusion in the normal way. Open a terminal, and give the root user a password:

$ sudo passwd

Log out of gnome, and get to a console by pressing fn + ctrl + option + F1, and login as root.

Edit /etc/passwd:

# vim /etc/passwd

Change the uid of your local user to that of your user on MacOS. You can find your MacOS uid by issuing the following command in Terminal:

$ ls -ln ~

It will probably be 501 or similar. Change the uid of the local user in Ubuntu (probably 1000) to 501. Do the same for your local group in /etc/group for Ubuntu.

You will also need to know the IP address of the VMware adapter on MacOS. Use $ ifconfig. It will probably be something like:

vmnet8: flags=8863<UP,BROADCAST,SMART,RUNNING,SIMPLEX,MULTICAST> mtu 1500
ether 00:50:56:c0:00:08
inet 172.16.97.1 netmask 0xffffff00 broadcast 172.16.97.255

You now have the option of putting this in /etc/hosts like:

<macos_hostname>.local 172.16.97.1

Which will allow you to refer to your MacOS as macos_hostname.local in the next section.

The next step is to mount the nfs shared home directory into /home/<ubuntuser>. Do this by editing /etc/fstab and adding a line at the bottom that looks like:

<macos_hostname>.local:/Users/<macosuser> /home/<ubuntuuser> nfs defaults 0 0

You should now be able to login to Ubuntu again by pressing fn + ctrl +option + F7 (maybe F8 on new Ubuntu’s), and have your MacOS home directory shared with your Ubuntu user and have full read/write permissions.

Yay.

I use a mac and iphone, therefore I use iTunes. Unfortunately, it’s the easiest solution to music management for the mac and iPhone.

I have a Time Capsule as well, which I use to store my music data, and this can be mounted to my laptop using AFP.

I also have an external hard drive, which contains a mirror of my music data, which I rsync from the Time Capsule weekly.

Being a unix variant, macos has the concept of symbolic links and I thought I could just use this feature to switch the path to my music between the Time Capsule or my external hard drive. Simple, replace a single symbolic link, and my music magically comes from a different backing store.

Unfortunately, iTunes resolves symbolic links when you add files to its library. So my symbolic link idea doesn’t work as well as I had hoped.

Bring in titl, Tools for iTunes Libraries. A not-very-well-written library to modify the binary iTunes library file. Once I hacked around the Java, I managed to get it to do what I wanted, and I now have a script which backs up my iTunes library file, finds/replaces paths and allows me to switch the source of my music data.

All because iTunes resolves symbolic links before storing paths.